Tutorial: How to Make a BJD Head in polymer clay
Materials:
You will have to have a few things in order to complete the head (ONLY THE HEAD MIND YOU)
- Super Sculpey Living Doll (No, ordinary Super Sculpey won’t do. Trust me.)
- Tools for sculpting (dentist tools, soft sculpting tools)
- Aluminum foil
- Paper tape
- Baking paper to put your doll on while baking
- Dremel or other multitool (with sanding-, drilling , cutting tool)
- Different types of sanding paper
- Plastic Eyes for dummytesting your doll’s eyewells (Or you can buy silicon eyes when you are done, they should fit well even without testing)
- Rolling-pin that is not used for foods
- Thermometer for ovens.
Make a Blueprint
No matter if you are going to make a whole doll or just the head, you should always use a blueprint.
First of all I suggest you to think it over what size your final head should be. You can look around at various sites selling dolls and on most of them you should find measurements which you can use as a base for your head.
As I am making a MSD I wanted his head to be 6-8” all around (I would suggest you to think that over, all wigs for dolls DO NOT come in all sizes).
There are a few ways on which you can get a blueprint:
Get a big paper and freehand draw your wanted doll in accurate size. Make one from the front and one from the left or right side of your doll. Also make the feet and the hands, as if they were foot- and handprints on the paper.
OR
If you suck at drawing on free hand or if you’re a bit lazy like me you can get a free template for your doll from Aimi Doll I picked a doll template that I found best for my MSD but you should really pick the one you like.
After that, I downloaded a trial version of Corel Draw. I can’t give you an exact guide on how I did the rest but if you take 15-20 minutes to get to know Corel Draw and read a few guides on the subject I think you can pull this off.
Anyhow, I used Corel Draw to get the doll in a correct size. You should use MATH for this.
Example on math you need to know:
You want the head to be 7”.
7”/Pi = diameter.
The resulting diameter is of course the head from ear to ear.
It might take some time to get this right but when you do it is really worth it. Don’t worry to get it PERFECT. Your doll won’t be -perfect- in that sense either.
You should do this with the rest of the head too, like the placement of the eyes, mouth etc.
When you are done, export your doll from Corel Draw. If your doll is going to be 40 cm, the final blueprint should be around 40 cm as well.
I downloaded a trial version of Poster7 and imported my blueprint. When I was asked what size I wanted the paper output to be I chose 45 cm, as that is the length of my blueprint. Poster7 then printed my blueprint on 4 pages which I had to tape together.
If you should have major difficulties with this step, feel free to contact me!
Make the head
Now, put your blueprint on the table and crumple a piece of aluminum foil.
Tape it with paper tape (or masking tape). As long as the tape is made of PAPER you should be fine.
Roll a piece of your clay out so that is covers the whole area around the aluminum core.
Now start making the head! First I suggest you mark where you want the facial features to be, before you sculpt.
Now.
Look at plenty of picture of both faces and doll faces. I printed quite a few doll pictures so I had a reference.
Or if you do not want to waste paper, just use a mirror! :D
Does he/she look like a sweety now? If not, change the features you do not like. It is better to kill your darlings at this step than doing it later.
Pull out the clay in the eyesockets. They should be empty when you bake him/her.
Also, do not forget to apply ears!
Now, bake! Use the thermometer to get the correct temperature. I made the mistake of trusting the oven that 130 C really is 130 C. It turned out to be 180 C!
Keep the thermometer in the oven the whole time while baking.
If you do not have a splendid oven on which you trust your life I suggest you babysit the clay the entire time.
Put the head chin down in the oven to minimize deformation.
Is it done?
Let it cool until the temperature is the same as the room’s and enjoy the head you’ve made!
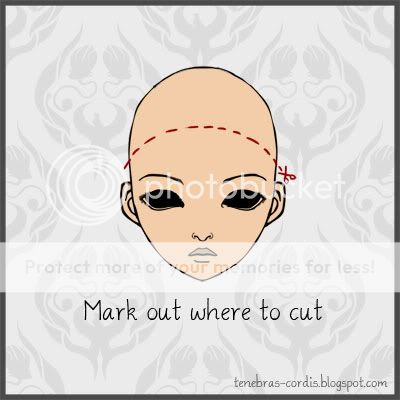
Now, LOBOTOMIZE!
Pull out a pen and draw on the head so you know where to cut. Don’t be too generous or too shy on this point, you are really making the headcap.
Put on your safety gear and your dremel with a cutting disc. Take a deep breath and cut along the side of the head.
When you can take them apart you are done. Don’t worry if the clay inside is not fully baked, you can bake that again later. It should be fairly baked though.
Pull out a few tools of your choice and start to pull the aluminum foil out along with the paper tape.
When you are done you should have a pretty little head on which you can sand, drill or anything you want.
Pull out your multitool and drill a hole in the bottom of the head where the neck shall be. If you accidentally drilled a hole that is too big or at the wrong place, fill the hole a bit with fresh clay and bake again. Be sure to pull the clay at the insides of the head before rebaking, so that the fresh clay sticks as good as possible.
Sand him/her now. You should sand both inside and outside. Test the eyes, see if they fit in the eye sockets. If they do not, don’t worry. Just sand a bit more. If you can’t do that because the clay is too thin I suggest you should buy silicon / soft glass eyes as they fill out gaps better than acrylic or glass eyes.
Also, professional dollmakers makes mistakes that render their dolls unable to use glass eyes so you should not feel weak about that.
The head cap you can make in many different ways. One way is to build an inner lock mechanism like I try to do.
You can also buy magnets to make it fit better. Really, I can’t say exactly how to do this step so I leave it to you to figure it out.
I hope you found this tutorial helpful!
![[BJD Project]](https://blogger.googleusercontent.com/img/b/R29vZ2xl/AVvXsEhz_UEN-DPBNGn1OitkN9b_5LxYKf5vxSoNZBAft1IfhXpo0YDLWlktgEHiFDxupyTi_d5IrBnytIwBqwExmBBNncgAcWRJ-8upTpBgNlD1CL7cUladYJUnExuqgS2AvEfgN6TJhBlxtc-H/s150/IMG_9176.JPG)